Ex Data, Scientia
Home
Contact
Using Reticulate for R-Python interaction
The programming languages R and Python have very complimentary strengths and weaknesses. Integrating the functions of both languages for working on a specific task can thus be a beneficial venture, and is enabled through the R package reticulate.
Clearly, neither R nor Python can fully replace one-another when it comes to implementing a wide range of programming tasks efficiently. Python is very suitable for "on-hands", application-oriented programming, and for handling very complex data in a very transparent manner. Further, Python code is very readable due to e.g. the omission of brackets in many cases (like loops) or the enforcement of indentation in loops and functions. Furthermore, the object-based programming scheme can be very intuitive. Ultimately, Python is a more suitable for engineering-related tasks. R, on the other hand, features very convenient statistics libraries, as well as very user-friendly and effective plotting capabilities (in form of the ggplot2 package). Also, it provides strong tools for the occasionally very demanding handling operations on datasets generated in experiments or research surveys.
For analysts bridging the gap between more experiment-oriented research and data science, like biologists, integrating the two programming languages Python and R can be a useful tactic. This has become especially relevant in recent times with the widespread introduction of Deep-Learning methods in a multitude of fields in research and industry. The Deep-Learning user community traditionally works with Python packages, so re-inventing the wheel to implement the same methodology in R seems like a waste of time. Nevertheless, statistical tools and strong plotting capabilities remain a necessicity, and are not so easily implmented in Python, at least not without a lot of experience. A constant workflow of generating results in Python, saving them to disk and loading them into R can be burdensome in the long term, however. The best soltuion would be to have direct access to both languages within one session, and to be able to pass data and objects from the functions of one language to those of the other, according to the required operations and preferences of the user.
This solution is provided - to a great extent - by the R package reticulate. This package enables calling Python objects from R, and just as well calling R objects from Python. It can be used directly in a console or simple R script, and thus also be used to create self-contained R scripts or mini-programs (executable scripts). However, it appears much more powerful when used in a RMarkdown document, which can be created in the popular IDE RStudio. I personally don't have a lot of experience in generating "knittable" RMarkdown files for presentation or writing purposes, and can therefore not tell how well reticulate works in that context. However, when using RMarkdown simply for your every-day data-anaylsis work, e.g. to obtain a nicely structured document, the package works like a charm.
To function properly, reticulate requires that the package be loaded via the "library" function in R. The "use_condaenv()" function is then used to enforce the use of a specific Python environment. In my experience, working simultaneously in the same Python nvironment in a reticulate session and a Spyder session does not put constraints on either session. Calling the package and invoking the "use_condaenv()" command is tpically done in the setup chunk at the beginning of the Markdown file. This may look like this:
```{r setup, include=FALSE}
knitr::opts_chunk$set(echo = TRUE)
library('reticulate')
use_condaenv('my_env', required = TRUE)
```
Here, the Python environment (generated via Anaconda, and therefore here called a "condaenv") my_env is called, the argument "required" enforces the use of this version, since reticulate has the habit of taking the name of the Python environment only as a hint and searching for other environments. It is also possible to enforce the use of a specific Python version (e.g. if you don't work with Anaconda environments), by invoking the use_python() function. However, I have had better success so far using the "use_condaenv()" function (as stated, reticulate is quite prone to picking the wrong Python version or environment if not properly forced). Running this initial chunk can require that you re-start the RStudio session, even directly after opening the RStudio program. This may depend on your computer's settings, but is easily achieved by pressing the keys Ctrl, shift and F10 simultaneously.
If you really like working with reticulate in RStudio, and plan to do so often, it may be useful to generate a RMarkdown template, which can be called every time you want to start a new RMarkown file in RStudio. This template then already includes the setup code chunk, so that you don't have to write it yourself every time you want to use reticulate in a new RMarkdown script. Here a very brief intstruction on how to create such a template:
If you haven't done so already, install the reticulate package using the"install.package()" function in R. Also make sure that the working directory of your R session is set to /home (in Linux; in Windows, this may be C:/Users/user/Desktop):
install.packages('reticulate')

setwd('/~')
Then invoke the "create()" function of the devtools package (again, install this package, in the same way as the reticulate package, if necessary). Pass a placeholder name for your new template to the "create" function as a character string:
devtools::create('RPython')
This opens a new RStudio window, and creates a folder structure named "RPython" in your home directory. Now, open this folder and create the following directory tree (manually): inst/rmarkdown/templates/RPy/skeleton.
Now, open an empty R script (not a rmarkdown script!) in RStudio, and write the following:
Note that there should be exactly two lines in this script: the line containing text, and the empty line below. Save this script as "template.yaml" in the directory /home/user/RPython/inst/rmarkdown/templates/RPy . Now open a new RMarkdown file and clear all the lines provided by default. Then write the following:
---
title: "RPy"
output: html_document
---

---
title: "Untitled"
output: html_document
---

```{r setup, include=FALSE}
knitr::opts_chunk$set(echo = TRUE)
library('reticulate')
use_condaenv('my_env', required = TRUE)
```
As you can see, the last block of lines is identical to the setup code chunk discussed above. These lines will appear as the default content of any new RMarkdown file created from this template. Save this file under the name skeleton.Rmd to the directory /home/user/RPython/inst/rmarkdown/templates/RPy/skeleton.
Finally,make sure again that the working directory of your RStudio session is set to your home directory. Then invoke the install() function of the devtools package to finally generate the RMarkdown template from your file structure and the two files created therein:
devtools::install("RPython")
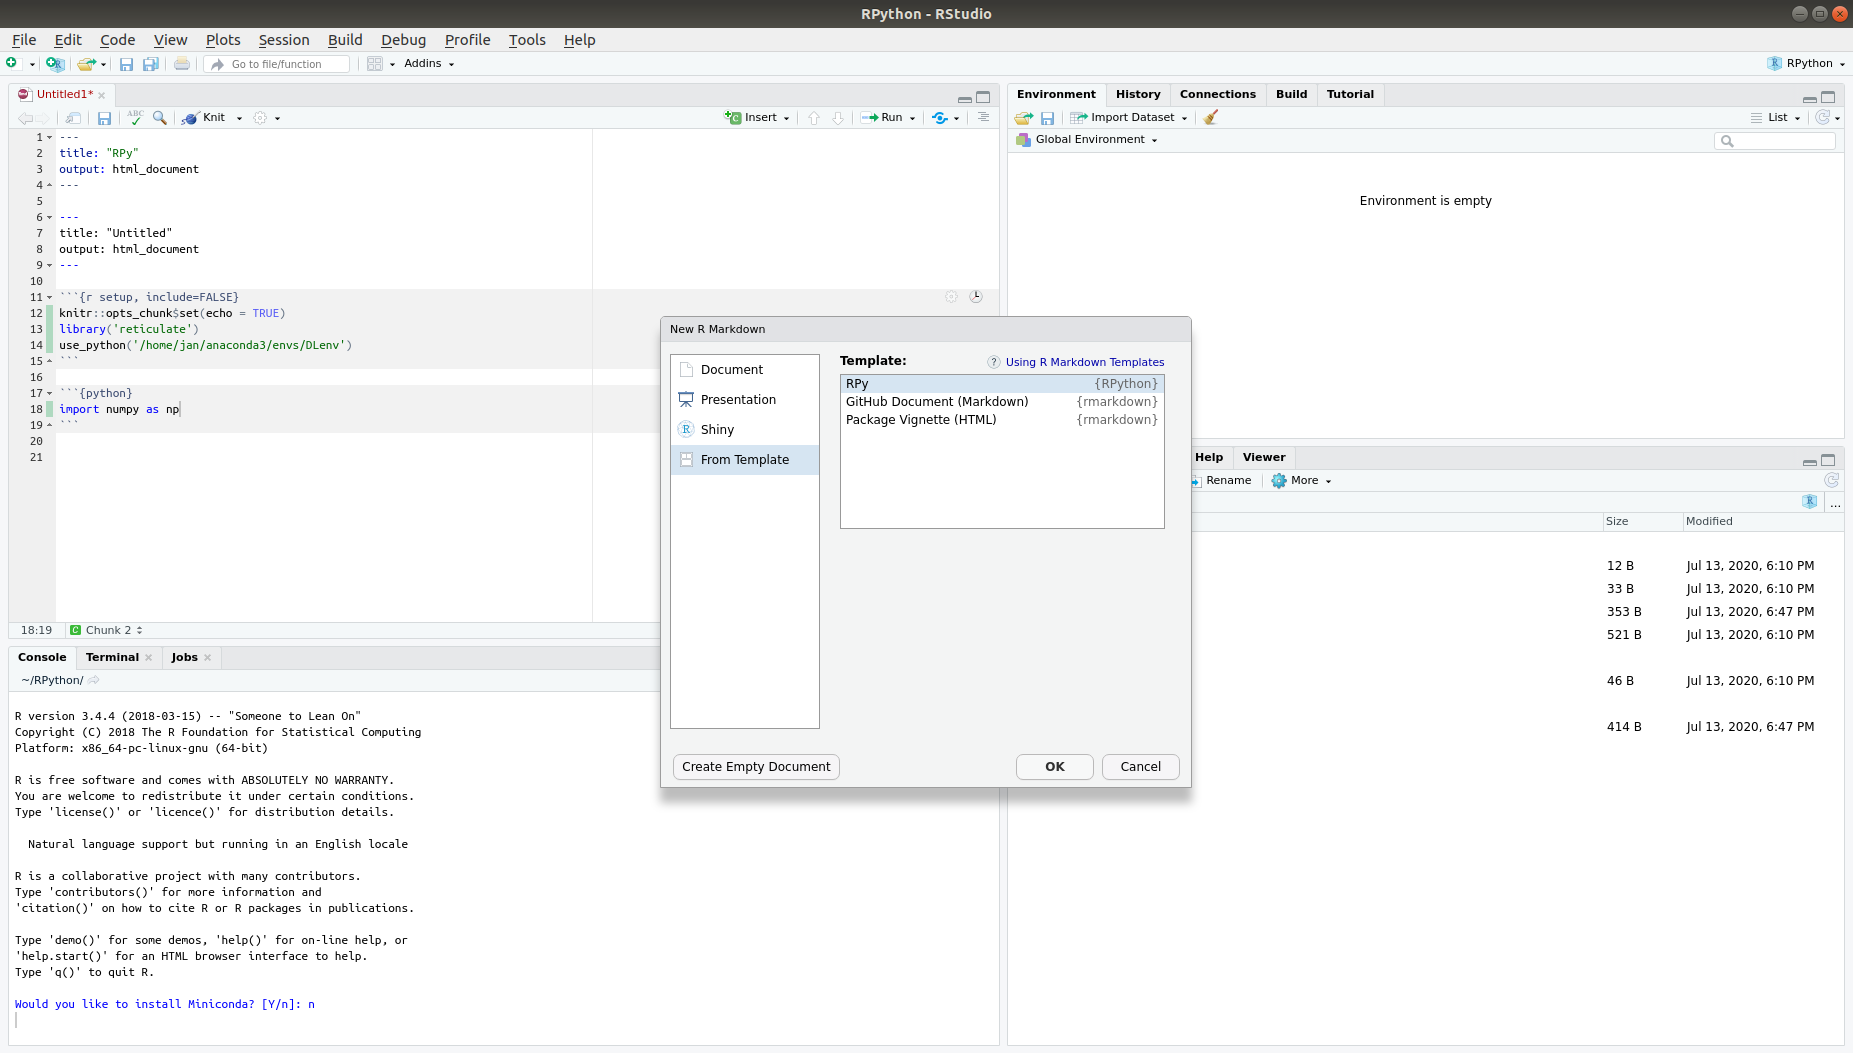
Now, this template is saved as a folder tree to your package library (if you have multiple R versions installed, it will be saved to the library of the R version you have been using to create the template). You can check if everything works fine by re-starting RStudio, and clicking on the "new file" icon. When opting to create a RMarkdown script, choose the "From Template" option in the menu on the left. Here, your ne template should appear under the name "RPy" in the list of available templates (this is the name we provided in the folder structure and in the first line of the skeleton.Rmd file).
This instruction has been adapted from an instruction given at https://chester.rbind.io/ecots2k16/template_pkg/. Rather than simply directing to this page, I felt some things needed to be changed a little, since I stumbled upon some unclear parts when trying to implement my first own template. As noted by the author, this method can also be used for creating entire R packages, though this does require some further skills.
Now let's take a look at the actual implmementation of reticulate: We start by inserting an R code chunk in our RMarkdown file. We create a simple vector "a":
Now we insert a Python code chunk below that. The "insert" button in the top menu of the RMarkdown context allows inserting code chunks for a range of programming languages, including the popular C++. We can now call the vector we just created in the R chunk by writing r.a. The "r." indicates that we call an object created in the R context. As you may already know, the dot indicates that "a" is an attribute of the "r object" (pretty much everything in Python is an object, so to integrate R with Python, R is apparently an object in the Python context, as well). The print-out of calling r.a shows that the original R vector has been converted to a Python list, denoted by the rectangular brackets. This is not exactly the same as a vector, but if you are familiar with Python, you know that you can easily convert it into a(one-dimensional) numpy array. Let us now create a list "b" in Python. Note that when running a Python chunk, there will be no green progress bar as in the R chunks.
```{python}
r.a

b = [4,5,6]
```
[1.0, 2.0, 3.0]
We can call this Python list in R by writing py$b. This means that there is a complex object in the global R environment named "py". This object collects all the objects created in Python as sub-components (like the columns in a formal R data-frame or the various summary statistics of a linear-model-class object). When printed, we note that the list has been transformed into a numeric vector. It is easy to let the R and the Python variables interact: For example, we can mutiply the "py$b" with the "a". Here we note that, again, the conversion is not exact: Multiplying a (numpy) vector anda list is not possible in Python (it is only possible to multiply a scalr with a list, whichresults in the list being replicated as many times as the value of the scalar). In contrast, since "b" has been converted to a vector, we have two mathematical objects which are multiplied element-wise:
```{r}
py$b

a * py$b
```
[1] 4 5 6
[1] 4 10 18
The multiplication works also in Python, but only if we convert "b" into a numpy array. We can also create a function in Python and call it from R. Let us define a function that returns the n-th root of an input "x":
```{python}
import numpy as np
r.a * np.array(b)

def root(x,n):
  out = x**(1/n)
  return(out)
```
array([4., 10., 18.])
Calling this function from R is easily achieved by accessing py with the $ operator, naming the function and passing the required input. It is of course also possible to define the same function in R and calling it from Python:
```{r}
py$root(27, 3)

root <- function(x, n){
  out <- x^(1/n)
  return(out)
}
```
[1] 3
This function is - naturally - called by accessing the r object. Of course, the greatest advantage in using reticulate is in accessing objects from either programming language that can not easily be replicated in the other language, like GAMs (generalized additive models) in R fitted on output from a Python function.
```{python}
r.root(27, 3)
```
3.0
Of course, you may not always just want to use reticluate in the context of a RMarkdown file, especially if you want to create a self-contained script that canrun as a "mini-program". In that case, reticulate can be activated by calling the py_eval() function. The argument to be passed to this function is the code that you want to run in Python, in form of a character string (which is then evaluated). You can pass either single lines of code (and call py_eval several times), or you can concatenate several lines by separting them via a comma. Don' forget to load the reticulate package at the beginning of your script if you don't work in RMarkdown, though!
```{r}
py_eval('import numpy as np, np.argmax([0,3,2])')
```
[1] 1
Of course, the story would not be complete without some constraints to the usage of reticulate. First, you should better use it if you have already some experience with Python and do fewer mistakes and can interpret error messages specific to Python more easily. For debugging, which is the essential part in the learning of any programming language, I find it convenient to be able to quickly switch between editor and console, and to get a good look at my variables in the environment. Both is not easily possible in RStudio, since that IDE is primarily targetted at writing R scripts. Second, it can be a bit difficult to recognize what objects are stored in py, and if they have been over-written by some Python command or not. Third, printing Python plots to the RMarkdown output is quite difficult, as over-plotting frequently occurs.
But if you can get past this, reticulate can be a highly convenient tool to integrate the different strengths of R and Python, a capability that will become more and more important in the near future! Many more details and tutorials can be found on the reticulate website: https://rstudio.github.io/reticulate/.